Showing posts with label home decor. Show all posts

Thursday, October 24, 2013

DIY Halloween Plate Charger

DIY Inexpensive Halloween Plate Charger

Decorate your home or make as a gift! This DIY Inexpensive Halloween Plate Charger can be made for under $2.

You will need:

  • Plate Charger ($1 from Hobby Lobby)
  • vinyl decals or vinyl sheets {affiliate link }
  • scissors, punches, vinyl cutting machine, etc (if not using precut vinyl decals)

Instructions

You will need to either purchase pre-cut vinyl decals or you can cut your own from plain vinyl sheets. You can purchase vinyl from your local craft store, online or from Davet Designs.

Step 1

DIY Inexpensive Halloween Plate Charger using vinyl decals

Apply your Halloween Vinyl Decals using the "How to apply vinyl lettering and decals" tutorial (see label "how to apply vinyl lettering" on this blog or click link).

Step 2

You're done! Plate chargers are great to display on a stand or hang on the wall.


Bridget Davet / Davet Designs

Using the affiliate links in this blog to make purchases helps support my site. Thank you in advance!

Tuesday, October 15, 2013

Frosted Painted Glass Jack-O-Lantern

Frosted Painted Glass Jack-O-Lantern

My challenge this week (if I choose to accept), involved making something pumpkin-like. We are having a "pumpkin exchange" next week at our Mom's-Night-In Craft Night. Each person will bring a craft pumpkin valued at around $10 to exchange. The instructions said "It doesn't have to be anything specific: glass, plastic, ceramic, burlap, glittery etc." I took that to mean "think outside the box", oh Craft Master. Visions of a glass pumpkin danced in my head. My first thought was to paint the inside of the glass with orange enamel paint and use black vinyl cutouts for the face. However, I have been wanting to do a frosted glass project for quite some time, so there you have it!

You will need:

Frosted Painted Glass Jack-O-Lantern Candy Bowl supplies


Instructions

I purchased the glass bowl from Hobby Lobby for $6.99 minus my 40% off coupon. I ended up having to use some adhesive remover to fully remove the stickers from the bottom of the bowl. Then I washed and dried the bowl.

Frosted Painted Glass Jack-O-Lantern Candy Bowl supplies

Draw your face for the Jack-O-Lantern on the BACKSIDE of the vinyl since it is paper and easier to write on than the vinyl itself. You can use any vinyl you choose, but I used the Oracal 631 Exhibition vinyl since it is a semi-permanent vinyl and easy to peel off. Vinyl is sold at most craft stores or you can buy vinyl online {affiliate link }.

Frosted Painted Glass Jack-O-Lantern Candy Bowl supplies

Cut out your pieces. Peel and stick your vinyl cutouts onto the glass and smooth down firmly.

Frosted Painted Glass Jack-O-Lantern Candy Bowl supplies

Take you bowl outside and spray paint the outside of the bowl. Use newspaper or something similar underneath. Follow the directions on the spray can for correct use. This was my first go round with frosted spray paint. I used Krylon Frosted Glass Finish purchased from Michael's for $9.99 minus my 40% off coupon. I did use almost half the small can for this one bowl. I sprayed 2 coats waiting about an hour between each coat. {My husband spray painted the second coat so I could take this picture :)}

Frosted Painted Glass Jack-O-Lantern Candy Bowl supplies

Let your pumpkin fully dry (about an hour). Bring inside and carefully peel off the vinyl. The frosted paint WILL scratch off.

Frosted Painted Glass Jack-O-Lantern Candy Bowl

VoilĂ ! This was a very quick and easy project that I think came out better than expected. Total cost was $10.18 plus tax, but I had enough spray paint to do a little over 2 projects, bringing the total down to $7.19 plus tax. I would imagine had I shopped around, I could have gotten a glass bowl at the dollar store for much cheaper, but I am on a time crunch. This would make a perfect hostess gift or any occasion present. Fill it with candy, potpourri, etc. before you give as a gift for that little something extra, or what we from Louisiana call "lagniappe"!


Bridget Davet / Davet Designs

Using the affiliate links in this blog to make purchases helps support my site. Thank you in advance!

Friday, December 14, 2012

Painted Wine Glass DIY


Personalized wine glasses are the perfect inexpensive gift for your wine lovin' friends. At only $1 per glass (plus the cost of paint), you can't go wrong!

You will need:


Note: As an Amazon Associate I earn from qualifying purchases. I may earn a commission from purchases made through these links.


Instructions

I purchased the wine glasses from Dollar Tree for $1 each. The enamel paint I had purchase a while back from Michael's on sale. You can also purchase it on Amazon (affiliate link). I ended up using 5 colors: white, black, pink, blue and purple. Any brand of the enamels acrylic paint will work. Make sure it says "for glass" on the bottle.


You can search on the web for some neat ideas for themes, but I chose to just wing it. I stuffed white paper towel in each glass so that I could see the paint a bit better while I was painting the glass.


I painted both names in black to start off with. The I painted pink flowers on the girl glass and blue flowers on the boy's glass. Then I painted purple swirls on both to tie the two colors together. I finished them off with a slight shadow effect to the names. I made these to go in a welcome basket. These are perfect Christmas presents as well. You could make one individual personalized wine glass or a set of 4 with a matching theme. Don't fuss to much over the perfect painting, your friends and family will love that you took the time to make this special gift for them!


Monday, December 3, 2012

Noel Christmas Chipboard Letters

Noel Christmas Chipboard letters

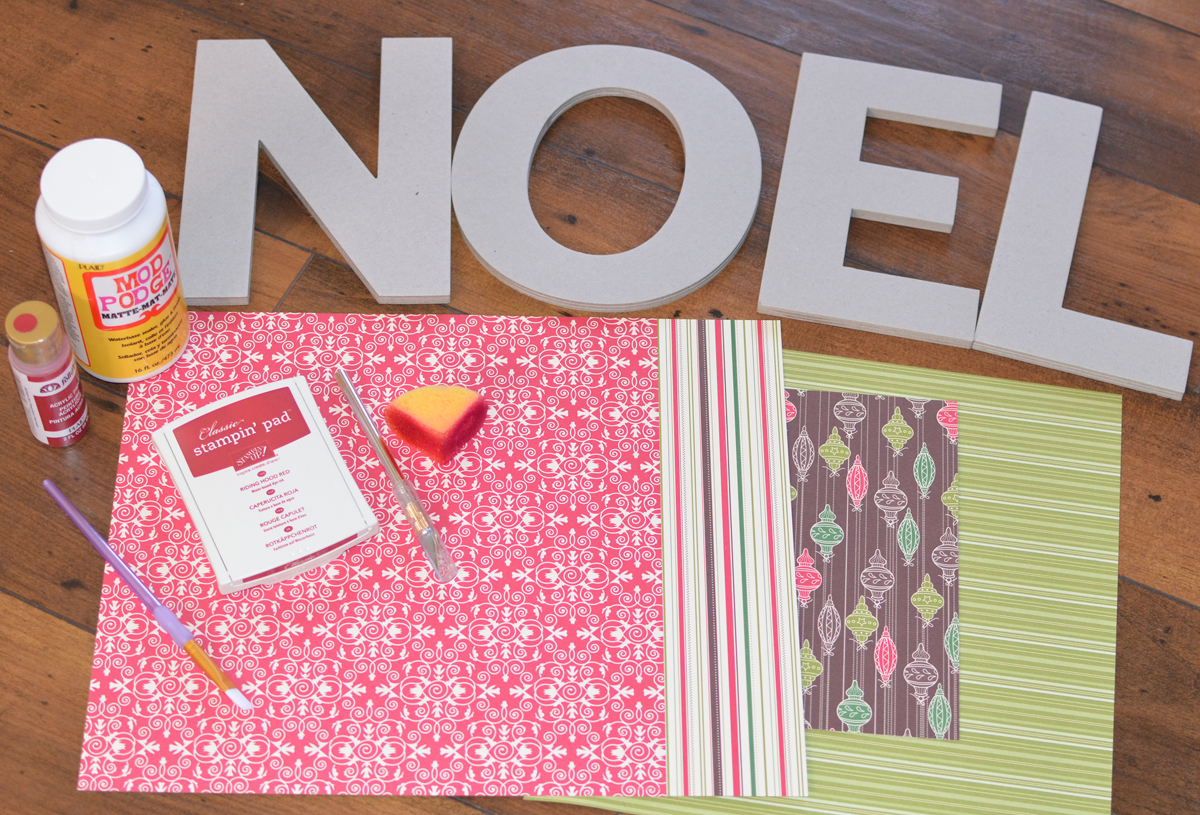
Joyeux Noel {Merry Christmas}! Decorating chipboard letters to match your Christmas decor is a quick and easy project. You can use Christmas scrapbook paper, or use any design that has the color to match your decor.

You will need:
Noel Christmas Chipboard Letter supplies

Instructions:

See our Basic Chipboard Tutorial on how to decorate your letters.


Bridget Davet / Davet Designs

Using the affiliate links in this blog to make purchases helps support my site. Thank you in advance!

Friday, November 16, 2012

Yarn Wreath Tutorial

Yarn Wreath Tutorial

Yarn wreaths are easy and fun to make. Sit back while watching TV and just wrap away! There are so many ways to embellish your yarn wreath - the possibilities are endless.

You will need:
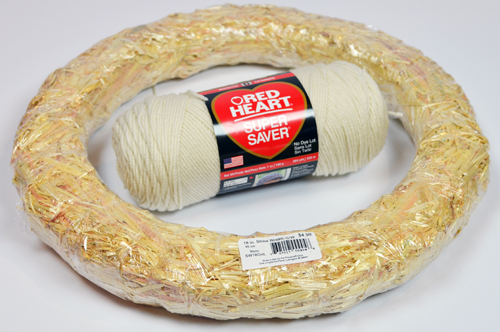
Yarn Wreath Tutorial supplies

  • Straw Wreath (or any other wreath you choose)
  • Yarn (any brand or color you'd like)
  • Glue gun (optional)

Instructions

These instructions are for the basic yarn wreath. You can choose to embellish them countless ways. See "yarn wreath" labels on this blog to view all my finished yarn wreaths. They are so easy, I will be making quite a bit of them soon! The wrapping of the yarn is a bit time consuming, but well worth it in the end.

You really can use any wreath or circle object you'd like, but I used a straw wreath. Keep in mind when choosing your wreath, the shape of the wreath form will show. For instance, the straw wreath is sort of "bumpy", so the finally wreath will be "bumpy" as well. In this tutorial, I used an 18" wreath, but the larger the wreath, the more work! Hobby Lobby has the widest selection of sizes for the straw wreaths (I think I chose the largest). Make sure you keep the plastic on the wreath, otherwise you will have a big mess and it will be hard to wrap. If the plastic tears, just patch it up with some tape, this will make it easier to wrap the yarn around. One skien should be plenty of yarn. I used a standard Red Heart Super Saver skien.

Yarn Wreath Tutorial step 1

On the BACK side of the wreath, hold the tail of the yarn as you wrap the yarn around the wreath and cross over the tail.

Yarn Wreath Tutorial step 2

Wrap the yarn a few more times, still crossing over the tail. Make sure you keep your yarn tight.

Yarn Wreath Tutorial step 3

Pull gently on the tail of the yarn. Then simply cut off the rest with scissors.

Yarn Wreath Tutorial step 4

Now turn your wreath over to where the front side is facing you. Continue wrapping your yarn around your wreath making sure the wreath is not showing though. You will NEVER be able to wrap it around perfectly with each pass lying neatly next to the other. The inside of a wreath is smaller than the outside. There is really no technique in wrapping the yarn and you will quickly develop your own style. I did a sort of "two steps forward, one step back" type wrapping {roughly}. There really is no rhyme or reason, just wrap!... and wrap... and wrap... and wrap! Depending on the size of the wreath and how fast you wrap depends on how long it will take. It is a good project to work on while watching TV or waiting for any appointment.
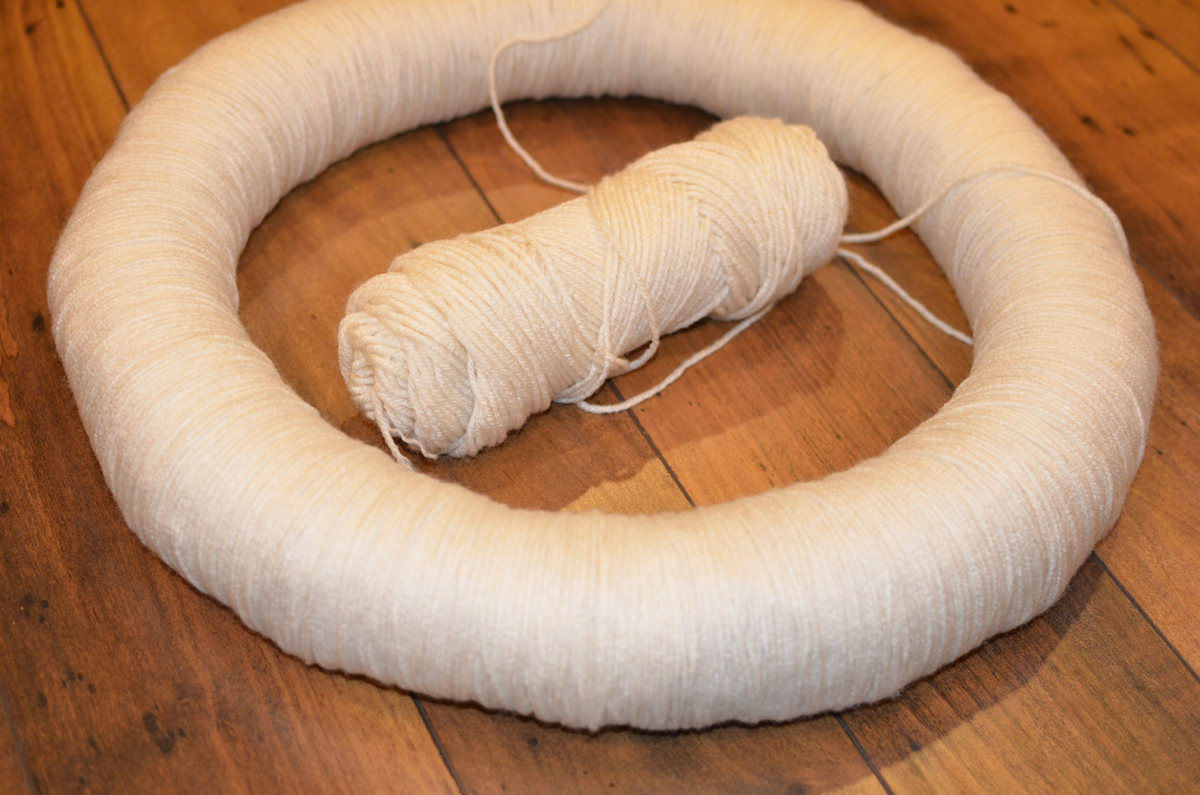
Yarn Wreath Tutorial finished with leftover yarn

Even using an 18" wreath, I still had plenty of yarn leftover. When you are finished wrapping your wreath, simply hot glue the end down on the backside or tread it through the back loops of the wreath.

Yarn Wreath Tutorial

You are not limited to using one color for the entire wreath. You can mix colors, alternate colors, overlap colors, etc. See more tutorials under the "yarn wreaths" label for ideas on how to decorate your yarn wreath.


Bridget Davet / Davet Designs

Monday, September 17, 2012

Stamped Tile Coasters - Fleur de Lis

Stamped tiles

I just love stamped tile coasters. These fun to make inexpensive tile coasters are the perfect handmade gift for just about any occasion. Use your favorite stamps to create unique and personalized gifts.

You will need:

Stamped tile supplies

  • 4”x4” Tumbled marble or Travertine tiles (9 per box for about $4.50)
  • StazOn stamp pads (black and Timber Brown)
  • Stamps (Background and Main images)
  • Sponge
  • Sticky back corksheets (Michael’s) cut to 3.5” x 3.5”

Instructions

I bought these smooth faced Travertine tiles at Lowe's for $4.50 per box of 9. You can also use the ones that aren't quite so smooth, depending on your preference. Wipe the tiles clean with a damp cloth and let dry completely.

Begin by inking up your large background stamp with black Stazon™ ink and stamp your tile. Use a generous amount of pressure. Don’t worry if your image is not stamped perfectly. This will give your tile a unique antique look. I used the "French Script" stamp from Stampin' Up.

Stamp your main image using black Stazon™ Ink. Allow the images to dry for about 10 minutes. If you'd like to use a non-solid image and don't want the background image to show through, see my other tile coaster tutorials. {taged: tile coasters}

Using a sponge, lightly tap sponge onto the brown Stazon™ ink pad. Begin on the outer corners and dab/rub toward the center. Continue to do all 4 coners and the sides to give it an anituqe look.

Allow tiles to dry completely overnight. Bake the tiles in your oven to heat set the inks (350° for approximately 30-45 minutes). There is no need to spray or seal your tiles. You want the natural stone to maintain it's absorbency.

Stick a piece of cork backing to each tile. I bought a large roll of sticky back cork from Michael's and cut into 3.5 inch squares. You can also use small round felt pieces in each corner and glue, but I feel the cork works better and looks more polished.

Stamped tile supplies

Wrap 4 tiles in a bundle with ribbon or twine for a perfect handmade gift!

Stamped tiles
Stamped tile supplies

Bridget Davet / Davet Designs

Tuesday, September 11, 2012

Basic Chipboard Decoration - Scrabook Paper

Decorating chipboard letters and frames is one of my favorite crafts. The results of this inexpensive, yet simple project, are amazing. There are countless project you can make using this basic technique. I will be uploading projects frequently under the tag of "chipboard letters".

You will need:


Note: As an Amazon Associate I earn from qualifying purchases. I may earn a commission from purchases made through these links.

Step 1


Paint the BACK, sides and just a tad of the front of the chipboard letter with acrylic craft paint. Wait 10 minutes and paint a second coat. Pick a color that matches/coordinates with your paper.


Step 2


With a hard bristled paint brush, brush the BACK of your scrapbook paper with Mod Podge. {Note: I was using a double sided paper. The striped side is my front.} It is best to use a semi-thick or thick paper. My favorite is Stampin' Up's paper. If the paper is too thin, it will tend to tear while cutting when it gets wet from the Mod Podge.


Step 3


Place the chipboard letter onto the paper immediately. Remember to put the FRONT of the letter (the unpainted side) facing the paper. Press firmly.


Step 4


Turn the paper and letter over. Smooth down the paper onto the chipboard letter, pressing down slightly over the sides. Let dry about 10 minutes.


Step 5


Turn the covered chipboard letter over. With a very sharp X-Acto knife, trim the paper from the chipboard letter.


If your X-Acto knife if not very sharp (mine was not very sharp and I was out of replacements), the paper will tear {as you can see in the picture, but covered up well enough for this project.}


Step 6

 
 Finished Letter


Tap your sponge several times onto your stamp pad. If you are using a new sponge, it might not look like you have any ink on your sponge, but you do. Choose a color that matches the color you painted the back of your letter. Dab your sponge on the edge of the letter in a dab - then drag toward the edge motion. Repeat around all edges. You can use as much or as little ink as you'd wish to get the desired effect. Inking the edges will give your letter a finished look.


Your chipboard letter is now finished! You can add embellishments if you like or use them just the way they are.


Using the affiliate links in this blog to make purchases helps support my site. Thank you in advance!

Related Posts Plugin for WordPress, Blogger...