Wednesday, November 28, 2012

KraftyBlok Nativity Scene With Vinyl Decals Tutorial

KraftyBlok Nativity Scene With Vinyl Decals Tutorial

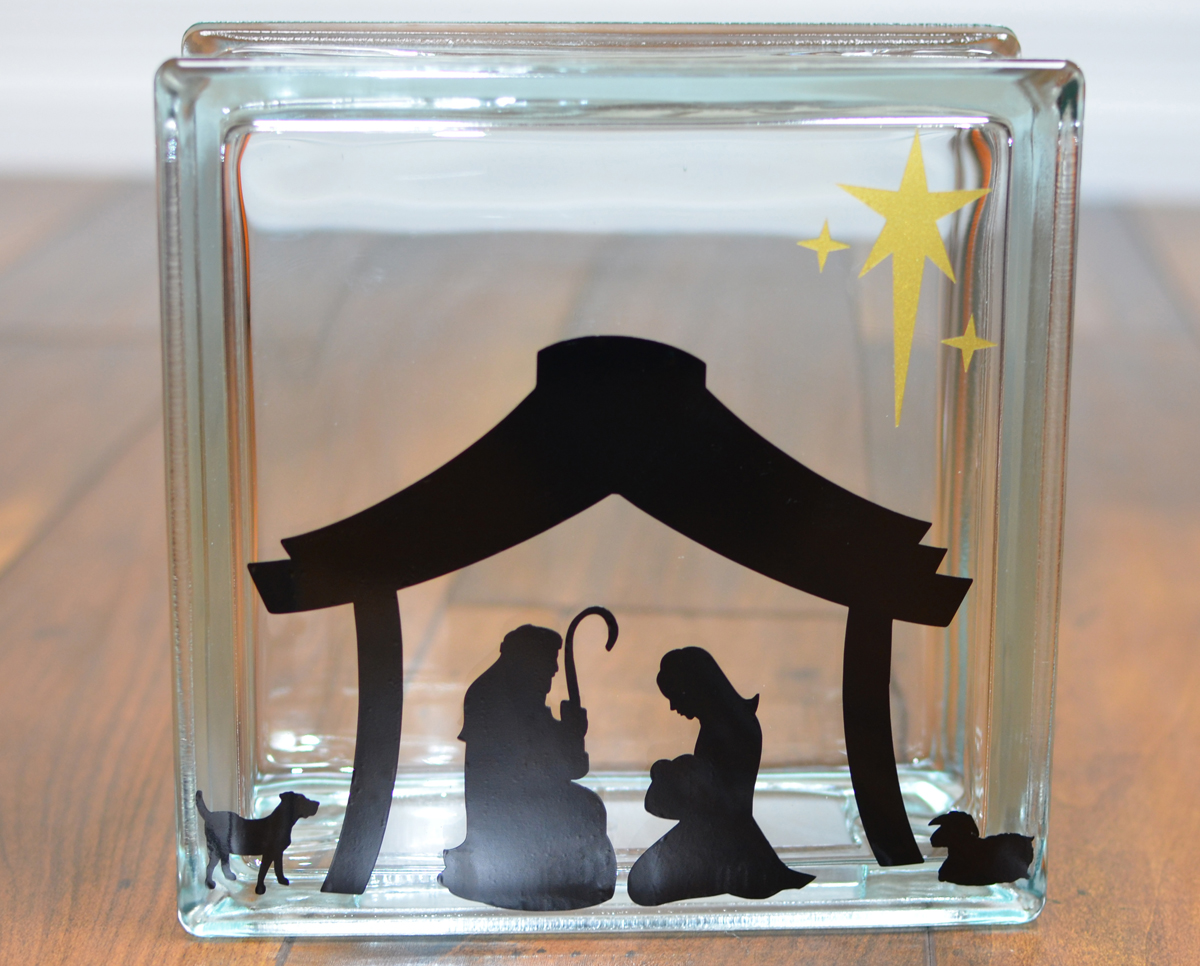
I'm in love with KraftyBloks! I loved creating this nativity scene for my Christmas decor. I wanted something that was simple and modern, but without a lot of small pieces.

You will need:

KraftyBlok Nativity Scene With Vinyl Decals Tutorial supplies


Instructions

First you will want to remove the packaging stickers from your KraftyBloks and clean them with glass cleaner. I purchased my KraftyBloks from Hobby Lobby using my 40% off coupon. They are about $10 each (without the coupon). The vinyl nativity scene decal set you can purchase from Davet Designs. The mini lights were also purchased from Hobby Lobby in the same end cap as the KraftyBloks.
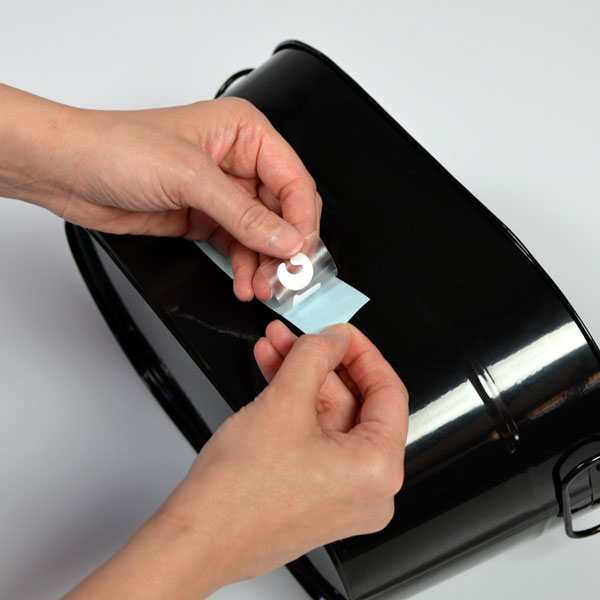
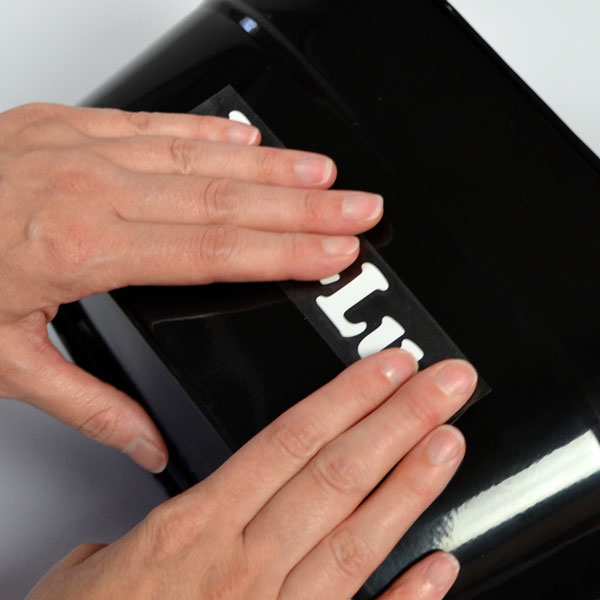
Step 1

Left side KraftyBlok Nativity Scene

Apply your Nativity Scene Vinyl Decal using the "How to apply vinyl lettering and decals" tutorial (see label "how to apply vinyl lettering" on this blog). Before you apply your decals, determine where you want the opening of the blocks to be located. I made the opening on the bottom for the middle block. For the sides, I had each of the openings face inward.

Step 2

KraftyBlok Nativity scene frosted glass

With your frosted glass spray, you will spray each of the 3 KraftyBloks (with the vinyl decals already applied). Make sure you spray paint the front, back and sides of each block, per the instructions on the can. The frost will give it a soft look and hide your lights.

Step 3

KraftyBlok Nativity Scene lights installation

Now you are ready to put the lights in your blocks. I purchased the battery powered mini lights, but you can use the plug-in lights as well. For the side blocks, tread the lights into the hole. For the middle block, you can tread the lights into the hole or just put the whole battery pack and lights into the block. If you put the battery pack into the block, you will have to open the block each time to turn it on and off.

KraftyBlok Nativity Scene lights on backside

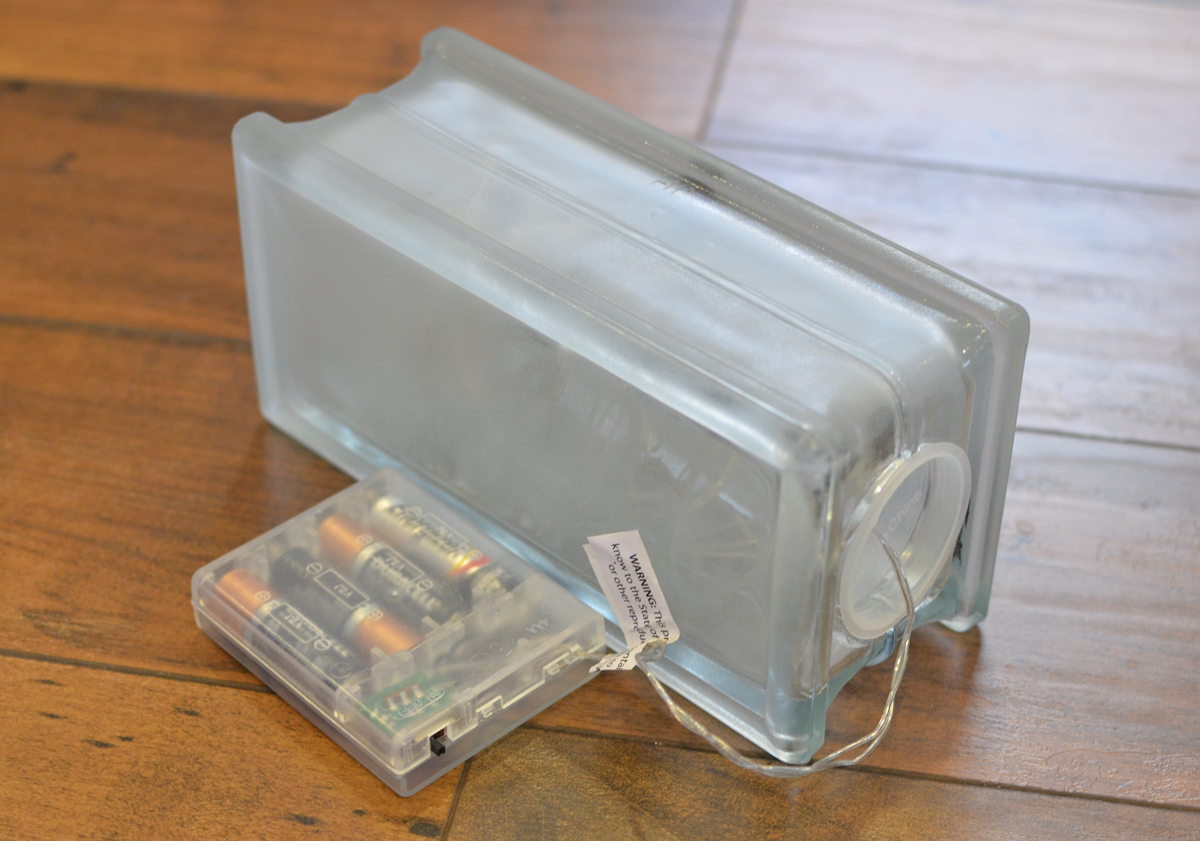
Loop the wire to the backside and set the battery pack behind the block. The frosted paint will hide the lights nicely.

Step 4

KraftyBlok Nativity Scene with ribbon

If you'd like, tie wire rimmed ribbon around each block and make a bow. This gives it a nice finished look.

KraftyBlok Nativity Scene with ribbon lighted

Your nativity scene is complete! Turn on the lights and enjoy. I set my nativity scene on a table covered with a fluffy cream colored blanket.


Bridget Davet / Davet Designs

Using the affiliate links in this blog to make purchases helps support my site. Thank you in advance!

Monday, November 19, 2012

12 Days of Christmas in a Jar - Preview

Yarn Wreath Tutorial

Christmas time is almost here!!! Starting December 1st, I will be posting the 12 days of Christmas - in a Jar! That's right IN A JAR! All 12 days will be crafts and presents that will be "in a Jar". So stock up now on jars of all sorts! I keep just about every jar we use around the house just in case. Jo-Ann's and Michaels both sell the quart size Ball smooth side (no logo) craft jars. I found the best deal at Jo-Ann's. I bought them online on sale and with free shipping. The stores tend to sell out fast so stock up now!!!

This is just a preview of some of the ones I'm working on. Check back on December 1st to see the finished products or subscribe to the posts so you don't miss out!


Bridget Davet / Davet Designs

Sunday, November 18, 2012

Travel Mug Wedding / Party Favor

Travel Mug Destination Wedding / Party Favor / OOT Bag

Travel mugs and tumblers are very popular right now. Such a simple and fun wedding favor, these are perfect for destination weddings, Out of Town guest bags, favors and more. You can pick up travel mugs of all sorts at just about any store, dollar store or on the internet. Just stick on your personalized stickers and you are done! The stickers were all purchased from Davet Designs. You can use your own design or choose from the many designs that Davet Designs has to offer.

Here are a few ideas submitted by Davet Designs customers:

Travel Mug Wedding / Party Favor


Travel Mug Wedding / Party Favor


Travel Mug Wedding / Party Favor


Some of the many designs you will find from Davet Designs that you can personalize for free:

Travel Mug Wedding / Party Favor

Travel Mug Wedding / Party Favor

Bridget Davet / Davet Designs

Friday, November 16, 2012

Yarn Wreath Tutorial

Yarn Wreath Tutorial

Yarn wreaths are easy and fun to make. Sit back while watching TV and just wrap away! There are so many ways to embellish your yarn wreath - the possibilities are endless.

You will need:

Yarn Wreath Tutorial supplies

  • Straw Wreath (or any other wreath you choose)
  • Yarn (any brand or color you'd like)
  • Glue gun (optional)

Instructions

These instructions are for the basic yarn wreath. You can choose to embellish them countless ways. See "yarn wreath" labels on this blog to view all my finished yarn wreaths. They are so easy, I will be making quite a bit of them soon! The wrapping of the yarn is a bit time consuming, but well worth it in the end.

You really can use any wreath or circle object you'd like, but I used a straw wreath. Keep in mind when choosing your wreath, the shape of the wreath form will show. For instance, the straw wreath is sort of "bumpy", so the finally wreath will be "bumpy" as well. In this tutorial, I used an 18" wreath, but the larger the wreath, the more work! Hobby Lobby has the widest selection of sizes for the straw wreaths (I think I chose the largest). Make sure you keep the plastic on the wreath, otherwise you will have a big mess and it will be hard to wrap. If the plastic tears, just patch it up with some tape, this will make it easier to wrap the yarn around. One skien should be plenty of yarn. I used a standard Red Heart Super Saver skien.

Yarn Wreath Tutorial step 1

On the BACK side of the wreath, hold the tail of the yarn as you wrap the yarn around the wreath and cross over the tail.

Yarn Wreath Tutorial step 2

Wrap the yarn a few more times, still crossing over the tail. Make sure you keep your yarn tight.

Yarn Wreath Tutorial step 3

Pull gently on the tail of the yarn. Then simply cut off the rest with scissors.

Yarn Wreath Tutorial step 4

Now turn your wreath over to where the front side is facing you. Continue wrapping your yarn around your wreath making sure the wreath is not showing though. You will NEVER be able to wrap it around perfectly with each pass lying neatly next to the other. The inside of a wreath is smaller than the outside. There is really no technique in wrapping the yarn and you will quickly develop your own style. I did a sort of "two steps forward, one step back" type wrapping {roughly}. There really is no rhyme or reason, just wrap!... and wrap... and wrap... and wrap! Depending on the size of the wreath and how fast you wrap depends on how long it will take. It is a good project to work on while watching TV or waiting for any appointment.

Yarn Wreath Tutorial finished with leftover yarn

Even using an 18" wreath, I still had plenty of yarn leftover. When you are finished wrapping your wreath, simply hot glue the end down on the backside or tread it through the back loops of the wreath.

Yarn Wreath Tutorial

You are not limited to using one color for the entire wreath. You can mix colors, alternate colors, overlap colors, etc. See more tutorials under the "yarn wreaths" label for ideas on how to decorate your yarn wreath.


Bridget Davet / Davet Designs

Thursday, November 8, 2012

Advent Calendar DIY

Advent calendar

It has been quite a few years since I've had or even thought about an Advent calendar. But now that I have a family and baby, I thought I'd like to start the tradition of one with them. I searched the internet for advent calendars and found the perfect one by Makoodle. I made a few changes and this is what I came up with!

You will need:

Advent Calendar supplies

  • 12x12 inch magnetic back frame
  • 25 - 2 inch favor tins
  • Magnets
  • Printable label paper or Modge Podge
  • Hot glue gun and glue
  • 2 inch paper punch
  • 1.75 inch paper punch (optional)

Instructions

I purchased the 12x12 magnetic back frame from Michael's for $11.99 on sale. I didn't realize they even sold them until I had already sent my husband to Lowe's for a metal sheet for him to cut down per Makoodle's instructions. I was shopping for a 12x12 inch frame at Michael's and hit the jackpot. At Michael's, I also purchased the 30 count Wilton brand favor tin kit for $19.99 minus my 40% off coupon.

Advent Calendar magnetic tin

Cut your magnet strips into 25 pieces (unless you purchased individual pieces). Stick a magnet onto the bottom of each favor tin. After a few days my magnets started to fall off and I had to go back and hot glue them.

Advent Calendar inside tin

They will then stick to the inside of the magnetic frame in 5 rows of 5. I thought of a few other ideas at this point for another project using the magnetic frame and tins when I reached this point. You could use the tins to hold little things and maybe make a game with the kids. Sounds like I just set a challenge for myself!

Advent Calendar inside tin

There are several ways you can make the numbers for your calendar. I printed 1.75 inch stickers since I liked a little bit of the clear window showing a peek into the tin. I used my commercial printer. At home, you can purchase 8.5 x 11 inch label stock from your office supply store and print the free printable downloads (see below) of the artwork (or create your own) on your home printer. You can also take the files and the stock to your local print shop and have them print them for you. With the 1.75 inch hole punch and punch each one out. Just stick the number to the top of the tin. Another way is the method used on Makoodle's post. Just print the free printable download onto cardstock paper. Punch each number out with your 2 inch hole punch. Cover the front of the cutout with Mod Podge glue. Glue it to the INSIDE of the lid and let dry.

Advent Calendar inside tin

For the inside of the tins, I printed family activities (see free printable download below) onto colored scrapbook paper. Using the 2" hole punch, I cut out the activities and placed one in each of the tins. I also put 2 candy treats in each tin (one for me and one for my husband). Handwritten notes might be nice as well and the kids could help.

Advent Calendar inside tin

Free Printable Downloads:

Copyright for free downloads and printables is owned by Davet Designs and is for personal, non-commercial use only. While these are completely free for personal use, please consider donating $1 (or more if you wish) to the Baby Helmet Project.

Feel free to link to the download on your site, but please link to the original post for the download (DO NOT use the original files on your site).

Advent Calendar inside tin Advent Calendar inside tin Advent Calendar inside tin

Advent Calendar inside tin Advent Calendar inside tin


Bridget Davet / Davet Designs

Tuesday, November 6, 2012

Candy in a Jar Party or Wedding Favor

Candy in a jar Wedding / Party Favor

I just love to see what my brides come up with! Such a simple quick and easy party or wedding favor. She filled these cute glass Apothecary jars with sixlets candy purchased from www.ohnuts.com. The jars she purchased from "The knot" shop (online). With using coupon codes and waiting for a sale, she said they came out to $1.68 a piece with shipping and tax. Each jar measures 1.75” x 3”.

The 1.25" personalized wedding sticker was purchased from Davet Designs. So many ideas are running through my head with this one... Christmas parties are right around the corner! I did my own internet search for "Personalized Glass Jar Favor Holder" or "Glass Apothecary Jar Favors" and depending on your quantity, the price might be even cheaper.


Bridget Davet / Davet Designs

Monday, November 5, 2012

How to apply vinyl lettering and decals

How to install and apply vinyl lettering and vinyl decals

Here are instructions on how to apply your vinyl lettering or vinyl decals. Vinyl lettering and decals can be purchased from DavetDesigns.com.

Instructions

How to install and apply vinyl lettering and vinyl decals - Step 1

Your vinyl lettering or decal will come in three layers: clear top layer transfer paper, the vinyl lettering, then the backing.

How to install and apply vinyl lettering and vinyl decals - Step 2

Carefully and slowly peel the clear transfer paper from the backing. The vinyl lettering should be stuck to the transfer paper.

How to install and apply vinyl lettering and vinyl decals - Step 3

If the vinyl sticks to the backing, lay that part of the transfer paper down and rub the top of the transfer paper so that the vinyl will stick to it.

How to install and apply vinyl lettering and vinyl decals - Step 4

Continue to peel the top layer and vinyl “sandwich” from the backing.

How to install and apply vinyl lettering and vinyl decals - Step 5

You will now have a piece of clear transfer paper with your lettering or decal attached.

How to install and apply vinyl lettering and vinyl decals - Step 6

Carefully place your sticker “sandwich” onto the clean surface.

How to install and apply vinyl lettering and vinyl decals - Step 7

Applying firm pressure, smooth your sticker down. If possible, let your sticker set for about an hour. The longer the vinyl is on the surface the stronger the bond of the adhesive will be.

How to install and apply vinyl lettering and vinyl decals - Step 8

Slowly peel back the transfer tape while gently applying pressure to the vinyl. The vinyl should stay stuck to your surface.

How to install and apply vinyl lettering and vinyl decals - Step 9

If the vinyl sticks to the transfer paper, lay that part of the transfer paper down and smooth it down. If this happens, it might help to apply pressure with the other hand.

How to install and apply vinyl lettering and vinyl decals - Step 10

Continue to peel the transfer paper from vinyl.

How to install and apply vinyl lettering and vinyl decals - Step 11

You’re done! The adhesive will continue to get stronger as the vinyl sets. Please wait 24-48 hours before washing the surface.


Bridget Davet / Davet Designs
Related Posts Plugin for WordPress, Blogger...