Showing posts with label painted glass. Show all posts

Friday, December 14, 2012

Painted Wine Glass DIY


Personalized wine glasses are the perfect inexpensive gift for your wine lovin' friends. At only $1 per glass (plus the cost of paint), you can't go wrong!

You will need:


Note: As an Amazon Associate I earn from qualifying purchases. I may earn a commission from purchases made through these links.


Instructions

I purchased the wine glasses from Dollar Tree for $1 each. The enamel paint I had purchase a while back from Michael's on sale. You can also purchase it on Amazon (affiliate link). I ended up using 5 colors: white, black, pink, blue and purple. Any brand of the enamels acrylic paint will work. Make sure it says "for glass" on the bottle.


You can search on the web for some neat ideas for themes, but I chose to just wing it. I stuffed white paper towel in each glass so that I could see the paint a bit better while I was painting the glass.


I painted both names in black to start off with. The I painted pink flowers on the girl glass and blue flowers on the boy's glass. Then I painted purple swirls on both to tie the two colors together. I finished them off with a slight shadow effect to the names. I made these to go in a welcome basket. These are perfect Christmas presents as well. You could make one individual personalized wine glass or a set of 4 with a matching theme. Don't fuss to much over the perfect painting, your friends and family will love that you took the time to make this special gift for them!


Wednesday, November 28, 2012

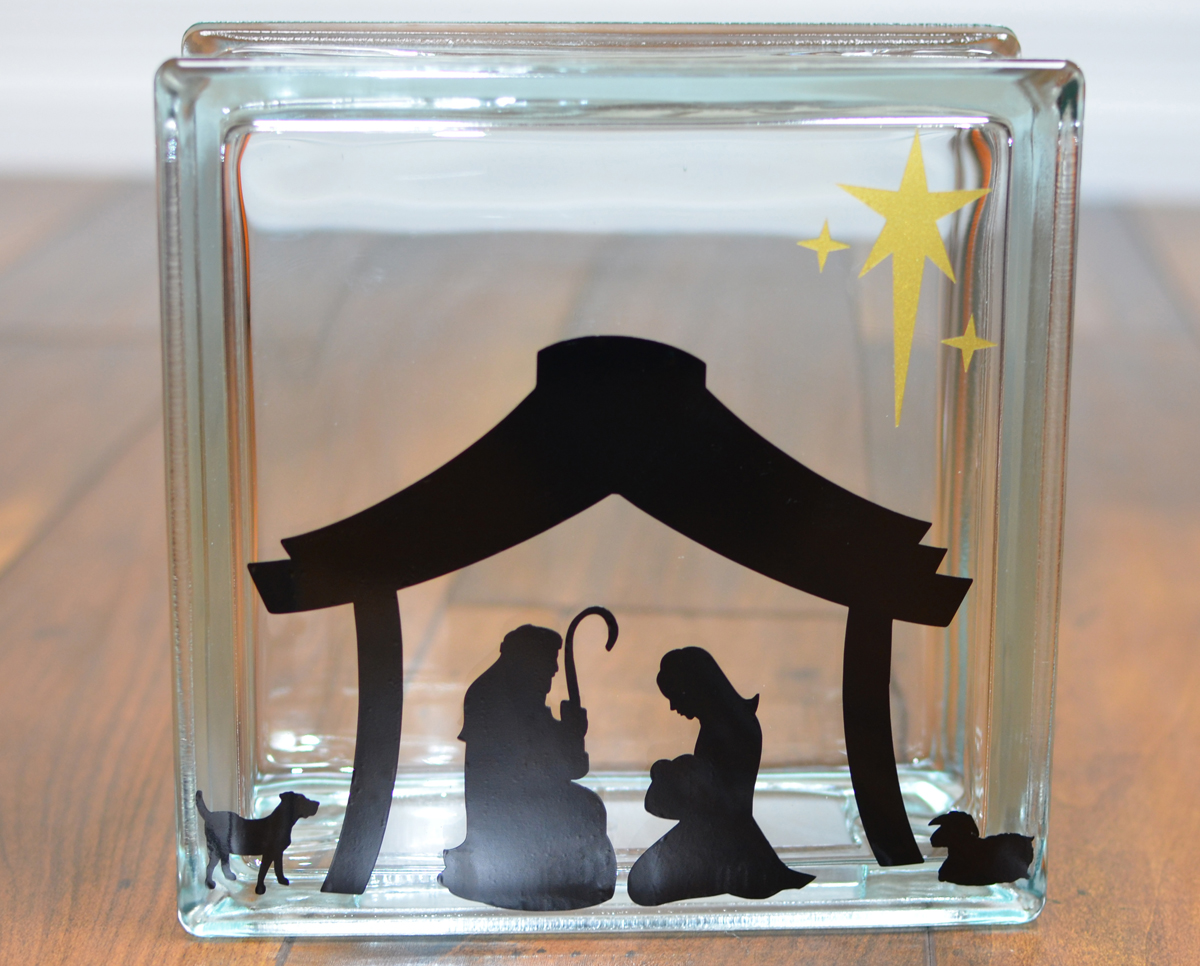
KraftyBlok Nativity Scene With Vinyl Decals Tutorial


I'm in love with KraftyBloks! I loved creating this nativity scene for my Christmas decor. I wanted something that was simple and modern, but without a lot of small pieces.

You will need:


  • 1 - 8x8 KraftyBlok or something similar
  • 2 - 4x8 KraftyBloks or something similar
  • 3 sets of mini lights (battery powered or regular)
  • Frosted Glass spray (Krylon) {Amazon link}
  • Nativity Scene Vinyl Decal
  • Ribbon (Optional)

Note: As an Amazon Associate I earn from qualifying purchases. I may earn a commission from purchases made through these links.


Instructions

First you will want to remove the packaging stickers from your KraftyBloks and clean them with glass cleaner. I purchased my KraftyBloks from Hobby Lobby using my 40% off coupon. They were about $10 each (without the coupon). If you find another type of block, make sure it has the hole to insert the lights inside if you are going to put lights inside. The vinyl nativity scene decal set you can purchase from Davet Designs. The mini lights were also purchased from Hobby Lobby in the same end cap as the KraftyBloks.

Step 1


Left side KraftyBlok Nativity Scene

Apply your Nativity Scene Vinyl Decal using the "How to apply vinyl lettering and decals" tutorial (see label "how to apply vinyl lettering" on this blog). Before you apply your decals, determine where you want the opening of the blocks to be located. I made the opening on the bottom for the middle block. For the sides, I had each of the openings face inward.

Step 2

KraftyBlok Nativity scene frosted glass

With your frosted glass spray, you will spray each of the 3 KraftyBloks (with the vinyl decals already applied). Make sure you spray paint the front, back and sides of each block, per the instructions on the can. The frost will give it a soft look and hide your lights.

Step 3

KraftyBlok Nativity Scene lights installation

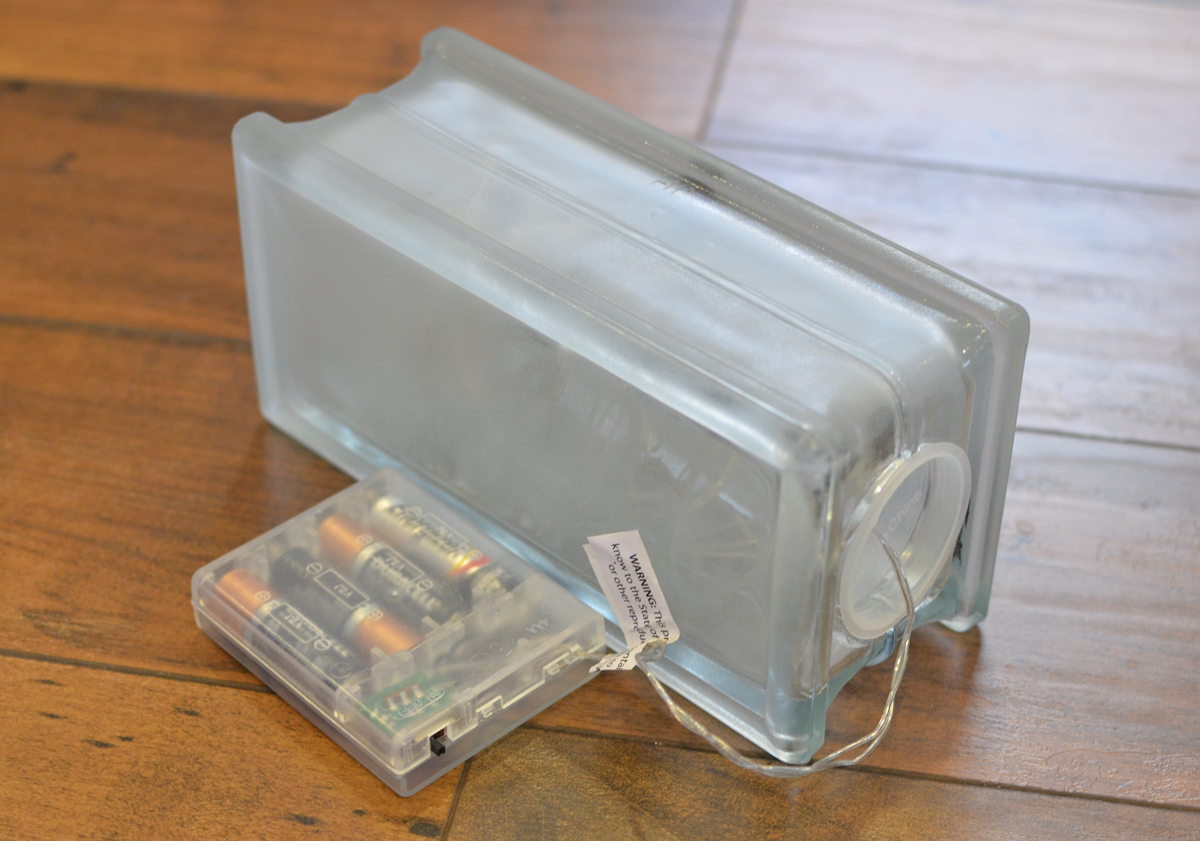
Now you are ready to put the lights in your blocks. I purchased the battery powered mini lights, but you can use the plug-in lights as well. For the side blocks, tread the lights into the hole. For the middle block, you can tread the lights into the hole or just put the whole battery pack and lights into the block. If you put the battery pack into the block, you will have to open the block each time to turn it on and off.

KraftyBlok Nativity Scene lights on backside

Loop the wire to the backside and set the battery pack behind the block. The frosted paint will hide the lights nicely.

Step 4

KraftyBlok Nativity Scene with ribbon

If you'd like, tie wire rimmed ribbon around each block and make a bow. This gives it a nice finished look.

KraftyBlok Nativity Scene with ribbon lighted

Your nativity scene is complete! Turn on the lights and enjoy. I set my nativity scene on a table covered with a fluffy cream colored blanket.


Using the affiliate links in this blog to make purchases helps support my site. Thank you in advance!


Saturday, October 20, 2012

Frosted Painted Glass Jack-O-Lantern Candy Bowl


My challenge this week (if I choose to accept), involved making something pumpkin-like. We are having a "pumpkin exchange" next week at our Mom's-Night-In Craft Night. Each person will bring a craft pumpkin valued at around $10 to exchange. The instructions said "It doesn't have to be anything specific: glass, plastic, ceramic, burlap, glittery etc." I took that to mean "think outside the box", oh Craft Master. Visions of a glass pumpkin danced in my head. My first thought was to paint the inside of the glass with orange enamel paint and use black vinyl cutouts for the face. However, I have been wanting to do a frosted glass project for quite some time, so there you have it!

You will need: 

Note: As an Amazon Associate I earn from qualifying purchases. I may earn a commission from purchases made through these links.


Instructions

I purchased the glass bowl from Hobby Lobby for $6.99 minus my 40% off coupon. You can also purchase one from Amazon. I ended up having to use some adhesive remover to fully remove the stickers from the bottom of the bowl. Then I washed and dried the bowl.


Draw your face for the Jack-O-Lantern on the BACKSIDE of the vinyl since it is paper and easier to write on than the vinyl itself. You can use any vinyl you choose, but I used the Oracal 631 Exhibition vinyl since it is a semi-permanent vinyl and easy to peel off. Vinyl is sold at most craft stores or you can buy vinyl online including Amazon. 


 Cut out your pieces. Peel and stick your vinyl cutouts onto the glass and smooth down firmly.


Take you bowl outside and spray paint the outside of the bowl. Use newspaper or something similar underneath. Follow the directions on the spray can for correct use. This was my first go round with frosted spray paint. I used Krylon Frosted Glass Finish that you can purchase from Amazon. I did use almost half the small can for this one bowl. I sprayed 2 coats waiting about an hour between each coat. {My husband spray painted the second coat so I could take this picture :)}


Let your pumpkin fully dry (about an hour). Bring inside and carefully peel off the vinyl. The frosted paint WILL scratch off.

VoilĂ ! This was a very quick and easy project that I think came out better than expected. Total cost was $10.18 plus tax, but I had enough spray paint to do a little over 2 projects, bringing the total down to $7.19 plus tax. I would imagine had I shopped around, I could have gotten a glass bowl at the dollar store for much cheaper, but I am on a time crunch. This would make a perfect hostess gift or any occasion present. Fill it with candy, potpourri, etc. before you give as a gift for that little something extra, or what we from Louisiana call "lagniappe"!


Related Posts Plugin for WordPress, Blogger...