


I'm in love with KraftyBloks! I loved creating this nativity scene for my Christmas decor. I wanted something that was simple and modern, but without a lot of small pieces.
You will need:

- 1 - 8x8 KraftyBlok
- 2 - 4x8 KraftyBloks
- 3 sets of mini lights (battery powered or regular)
- Frosted Glass spray (Krylon) {Amazon link
}
- Nativity Scene Vinyl Decal
- Ribbon (Optional)
Instructions
First you will want to remove the packaging stickers from your KraftyBloks and clean them with glass cleaner. I purchased my KraftyBloks from Hobby Lobby using my 40% off coupon. They are about $10 each (without the coupon). The vinyl nativity scene decal set you can purchase from Davet Designs. The mini lights were also purchased from Hobby Lobby in the same end cap as the KraftyBloks.
Step 1

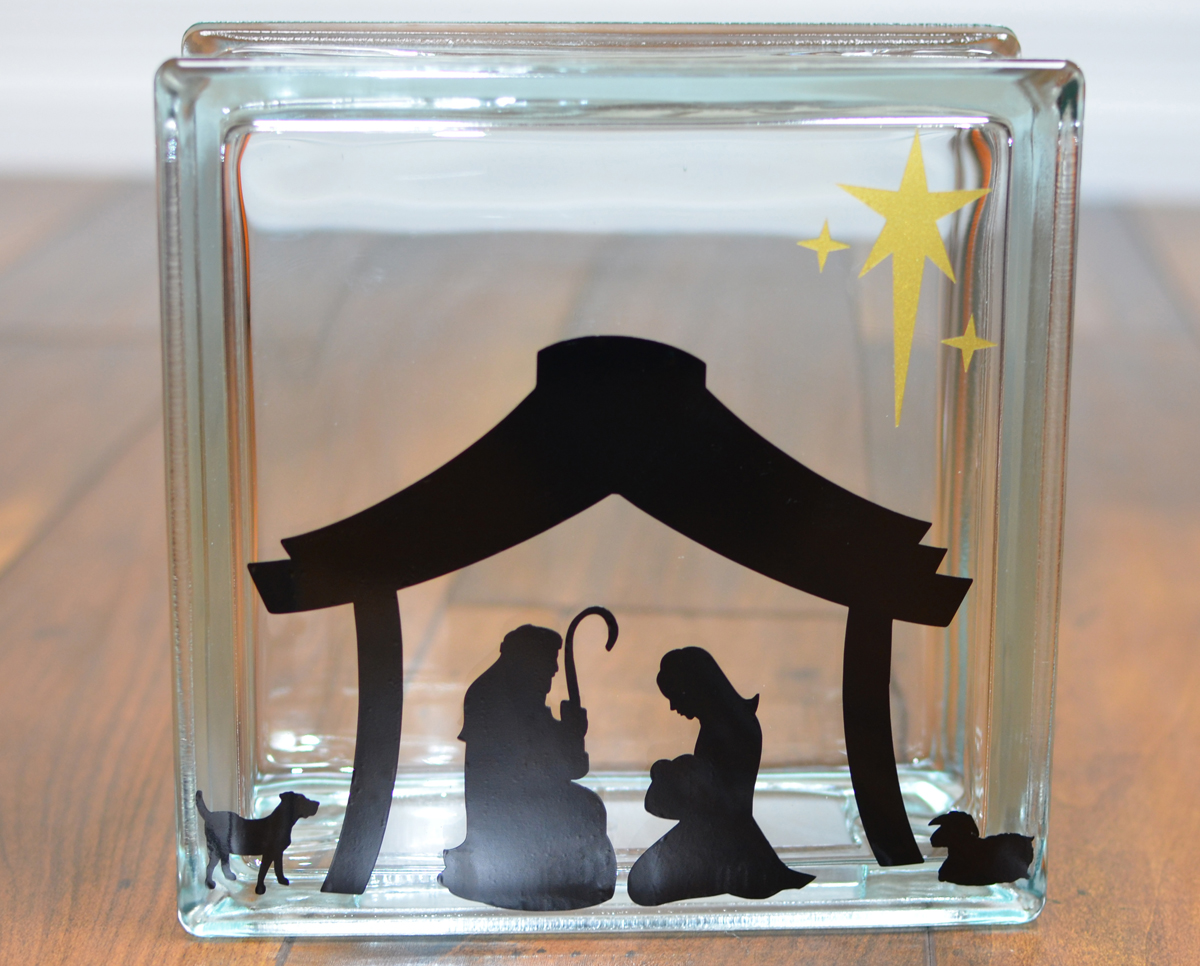

Apply your Nativity Scene Vinyl Decal using the "How to apply vinyl lettering and decals" tutorial (see label "how to apply vinyl lettering" on this blog). Before you apply your decals, determine where you want the opening of the blocks to be located. I made the opening on the bottom for the middle block. For the sides, I had each of the openings face inward.
Step 2

With your frosted glass spray, you will spray each of the 3 KraftyBloks (with the vinyl decals already applied). Make sure you spray paint the front, back and sides of each block, per the instructions on the can. The frost will give it a soft look and hide your lights.
Step 3


Now you are ready to put the lights in your blocks. I purchased the battery powered mini lights, but you can use the plug-in lights as well. For the side blocks, tread the lights into the hole. For the middle block, you can tread the lights into the hole or just put the whole battery pack and lights into the block. If you put the battery pack into the block, you will have to open the block each time to turn it on and off.
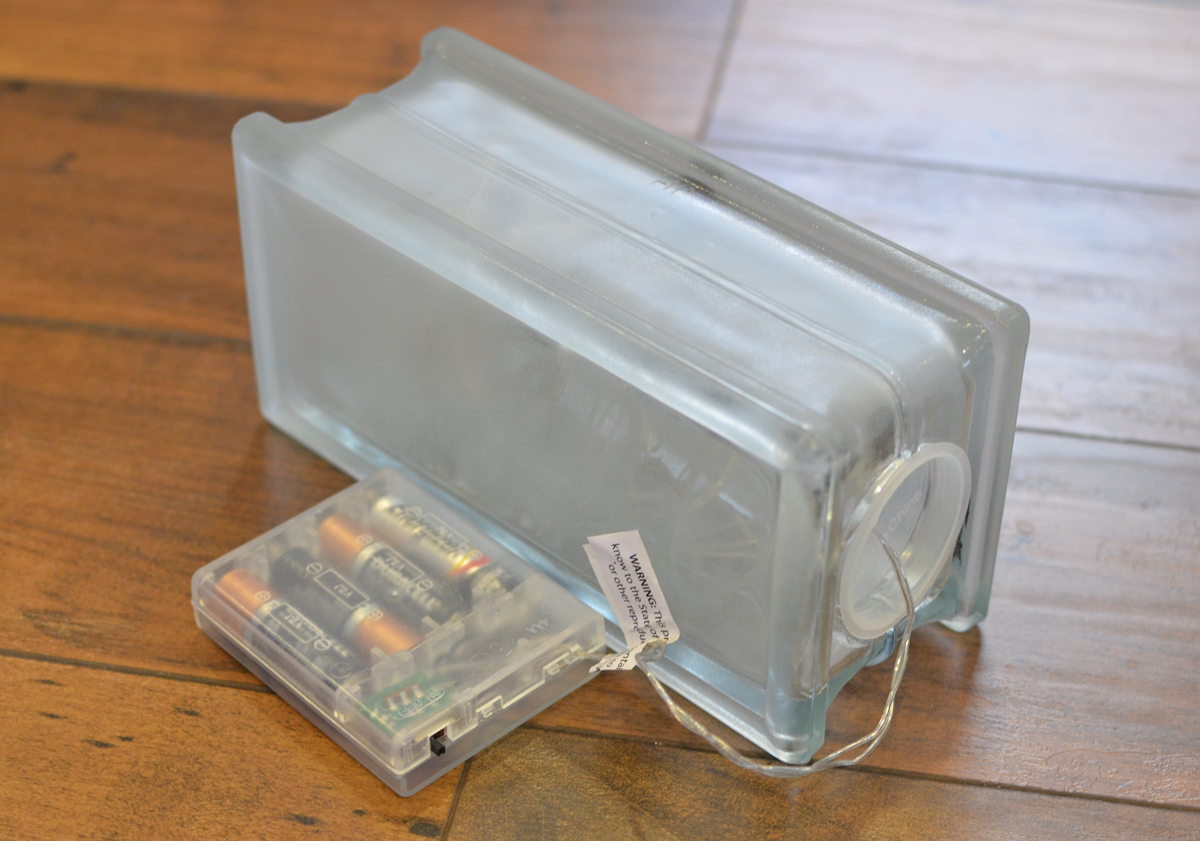
Loop the wire to the backside and set the battery pack behind the block. The frosted paint will hide the lights nicely.
Step 4

If you'd like, tie wire rimmed ribbon around each block and make a bow. This gives it a nice finished look.

Your nativity scene is complete! Turn on the lights and enjoy. I set my nativity scene on a table covered with a fluffy cream colored blanket.

Using the affiliate links in this blog to make purchases helps support my site. Thank you in advance!
Really amazing and enjoying different kinds of shades can be used when making personalized vinyl decals in a small home model such as green and black and many more eye-catching shades.
ReplyDeleteGreat idea here. Love the finished look.
ReplyDeleteI love how elegant this is. I would love to use the picture you took of the final product to put on a Christmas party invitation. Can I pay you to use this photo? If so please send my your contact information to my email dionira@hotmail.com. Thank you so much.
ReplyDeleteThis is so pretty
ReplyDeleteVery nice! I hadn't seen the rectangular blocks before. Dumb question--you say you sprayed the blocks after applying the decals, but it doesn't look like the decals got "frosted" with the spray. Can you explain a little more how you applied it? Thanks!
ReplyDeleteThe decals were sprayed over as well, just can't really tell in the picture. just makes them a little more matte looking than before sprayed.
DeleteI bought the vinyl nativity scene from Dave's design what site do I go to purchase this?
ReplyDeleteThis is my first time i visit here and I found so many interesting stuff in your blog especially it's discussion, thank you. child resistant custom mylar bags
ReplyDeleteThis comment has been removed by the author.
ReplyDeletethanks for sharing info about vinyl decals
ReplyDeletevisit custom vinyl stickers in australia
ReplyDeleteThanks for such an informative There is an amazing fact you have mentioned.
Keep posting!
Cannabis Packaging
Custom Marijuana Packaging
Your work is very inspiring. This article is material that is absorbing and interesting. The points made here are original. I hope you. continue this. Your work surpasses my expectations. Want seamlessly designed vinyl sticker decals in UK? If yes, than Quantum Print is the company where you can find the perfect vinyl decals easily.
ReplyDelete
ReplyDeleteCustom Waterproof Decals
is a simple yet effective way to advertise your business. You can customize your stickers to meet your needs and order them in bulk for a lower cost per piece. This is especially useful for businesses that need quality prints in large quantities for product packaging, event giveaways, or to brand merchandise. Before you get started, you need to decide what kind of sticker you want and how many you need. There are many types of sticker materials that you can choose from including premium paper, vinyl, BOPP and textured adhesive.
This comment has been removed by the author.
ReplyDelete
ReplyDeleteYour blog is so informative and have unique wording. Learn More: custom transparent logo stickers are a great way to make your logo stand out. You can use them as giveaways at events like trade shows or networking parties, and you can also stick them on your brochures, flyers, or any other marketing materials. With Canva’s sticker logo maker, you can create a professional-looking design in just minutes. The free online graphic design tool allows you to choose from thousands of editable templates and design elements.
ReplyDeleteThank you for writing such a great informative article for today's modern readers. Two thumbs up for great content and interesting views. I could only aspire to write like this. There are many different ways for cutting material and the right method can make all the difference. When you’re making stickers for outdoor applications or even items that need to be washed in the dishwasher. Vinyl is a great option for these applications, and it’s available in a variety of thicknesses to meet your needs. You can also choose to laminate your custom waterproof stickers
ReplyDeleteBuy the best quality roll stickers in USA from Rollstickersco.com We are the leading manufacturers of custom, Die Cut custom vinyl stickers waterproof with free shipping
ReplyDeleteLarge variety of waterproof labels for bottles along with waterproof vinyl stickers custom are available at astickerprinting com in different shapes colors
ReplyDeleteBuy the best quality roll stickers in USA from Rollstickersco.com We are the leading manufacturers of custom, Die Cut waterproof logo stickers with free shipping
ReplyDeleteLarge variety of waterproof labels for bottles along with custom made waterproof stickers are available at astickerprinting com in different shapes colors
ReplyDeletecustom vinyl stickers waterproof printed with your designs, personalized with your custom shapes, and always available with free shipping, and fast turnaround.
This is a great article with well-scripted, engaging content that is full of original and sensible views. Much of your informative content is in line with my way of thinking. Order packaging roll stickers for all your packaging materials, buy custom packaging stickers in all sizes, shapes and colors with on-time delivery.
ReplyDeleteThis KraftyBlok Nativity scene looks absolutely stunning! It’s amazing how vinyl stickers can transform simple glass blocks into beautiful, personalized decor pieces.
ReplyDeleteAt Sky Print and Enterprise, we specialize in creating custom vinyl stickers perfect for crafts like this, as well as for branding, packaging, and home decor. Our stickers are durable, easy to apply, and available in a variety of finishes — from matte to glossy allowing for endless creative possibilities.
Seeing projects like this inspires us and our clients to think outside the box when it comes to design. Thanks for sharing such a creative idea — looking forward to more vinyl magic!
Bath Bomb Boxes | Custom Bath Bomb Packaging Wholesale in UK
ReplyDeleteCustom Bath bombs packaging Boxes made from high quality material, these give you an opportunity to display your product likewise. Call 07360238910